Solar Panel Installation Process in India: What Happens from Day 1 to Switch-On
Many homeowners want solar but delay the decision because they are worried about the installation itself. Will the roof be damaged? How long will workers be in the house? Will there be drilling everywhere? What happens with the electricity connection? These are reasonable concerns, especially for families doing this for the first time.
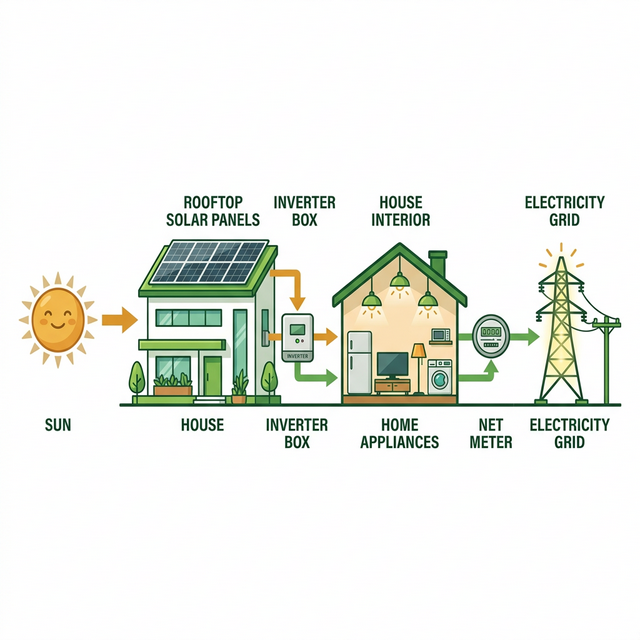
A professional rooftop solar installation is much less chaotic than most people imagine. When the project is well planned, the process is orderly: survey, design, structure, panel mounting, inverter work, testing, and then the net meter follow-up. The physical installation is usually only a small part of the overall journey. Paperwork and approvals often take longer than the rooftop work.
Before Day 1: The site visit and design phase
Everything starts with the site visit. An engineer checks roof dimensions, sunlight exposure, shading from neighbouring buildings, cable route options, and the condition of the electrical panel. Load calculation is part of this stage. The goal is to understand how much electricity you actually use and whether the roof can safely and efficiently support that capacity.
Good installers also do a basic shadow analysis. A panel under partial shade can affect the output of a larger string, so roof layout matters. After the visit, the design team prepares a proposal that usually includes estimated generation, system size, structure concept, and pricing. In a disciplined workflow, the proposal can be ready within 48 hours. If subsidy is relevant, the paperwork process should begin alongside design rather than after installation.
Day 1 (morning): Mounting structure installation
The first visible stage on site is structure installation. For most homes this means GI or aluminium mounting frames placed on the roof according to the design layout. Drill points are marked carefully, anchors are installed, and sealing measures are used so waterproofing is not casually compromised. A competent team does not “just drill and hope.” They work to preserve roof integrity while creating a stable, wind-resistant mounting base.
This stage usually takes around 3 to 5 hours for a standard home project, depending on roof access and size. When homeowners hear drilling, they often assume leakage is inevitable. In reality, poor workmanship causes leakage, not the idea of solar itself. The quality of anchoring and sealing matters more than the mere fact that the roof was touched.
Day 1 (afternoon): Panel placement and DC wiring
Once the structure is ready, panels are mounted and aligned. The technicians then begin DC string wiring, connecting panel outputs in the required series or series-parallel arrangement. Cables should be routed through proper conduit or protected runs, not left loosely exposed on the terrace. Good cable management is not cosmetic. It protects the system from weather, accidental damage, and long-term deterioration.
This stage often takes another 3 to 4 hours for a typical residential system. By the end of it, the roof starts to look complete, but the system is not ready to power the home yet. The electricity coming from the panels is DC, and it still needs to pass through the inverter and associated protections.
Day 2: Inverter and AC wiring
On the next working block, the inverter is installed in a shaded, ventilated location. This may be near the distribution board, in a utility area, or on a protected wall space. Inverter placement matters because heat and dust affect performance and service life. The team then completes AC wiring from the inverter to the home’s electrical distribution system.
This stage also includes essential safety components: isolators, earthing, and surge protection as required by the project design. These parts are not exciting in a brochure, but they are critical to electrical safety. The work commonly takes 3 to 4 hours for a normal home installation. At this point, the system is close to operational from an electrical perspective.
Final testing and switch-on
Before handover, the installer performs generation and safety tests. DC values, AC output, inverter status, and protection behavior are checked. The homeowner is usually shown how to read the inverter display or mobile monitoring app. On a bright day, your first day’s output should look reasonable for the installed capacity and the local weather. A 3 kW system, for example, may produce around 8 to 12 units in a day under fair conditions.
You should also know what to monitor yourself. Weekly checks are enough for most homes. Look for obvious drops in output, app alerts, tripped protection devices, or visible dirt buildup if your area is dusty. Solar is low-maintenance, but not zero-attention.
Net meter application and the waiting period
Many homeowners assume the project ends when the inverter turns on. In reality, the next important stage is net metering. AdiSolar files the relevant application on installation day or immediately after the system is ready, depending on the local process. The DISCOM then inspects and approves the connection flow. In many Indian states, this takes 2 to 4 weeks, though actual timing varies.
During this waiting period, you can still benefit from self-consumption. Power generated and used inside the home reduces the electricity you would otherwise buy from the grid. What you may not receive yet, depending on status, is the full export credit advantage of an active net meter. That distinction is worth understanding so expectations stay realistic.
After installation: your long-term relationship
Once the system is live, the relationship should not end with a final invoice. You should receive access to monitoring, basic cleaning guidance, warranty details, and a clear escalation path if output falls or an electrical issue appears. Annual cleaning and occasional inspection are usually enough for well-installed systems. Some homeowners choose an AMC for periodic checks, especially in dusty cities or larger homes.
The best installer is not simply the one who finishes fastest. It is the one who remains accountable. If you want a professionally managed installation from design through switch-on and post-install support, start with AdiSolar. If you are still working out system size and budget, use the solar calculator first.
Frequently asked questions
How long does the physical installation take?
For many homes, the rooftop and electrical work is completed in one to two days. Complex roofs or weather delays can stretch that slightly.
Will drilling damage my roof waterproofing?
Not when the work is done correctly. Leakage risk is mainly a workmanship issue, which is why structure quality and sealing details matter.
Do savings start before net metering is fully active?
Yes, because self-consumed solar power already reduces grid consumption. What changes after net metering is how exported surplus is credited.
Author
Written by Sanjay Patel, AdiSolar
Sanjay Patel works with the AdiSolar team to turn subsidy rules, pricing, and rooftop design decisions into practical guidance for Indian homes and businesses.
Ready to go solar? Book your free site visit
Get a rooftop assessment, system recommendation, and honest pricing based on your actual roof and monthly consumption.
Book your free site visitContinue Reading
Related posts
Solar Panel Cost in India 2026: What You'll Actually Pay (After Subsidy)
A 3 kW residential system costs ₹1,20,000–₹1,80,000 after government subsidy. Here's how the numbers break down.
Read this nextPM Surya Ghar Muft Bijli Yojana: Complete Application Guide for 2026
Up to ₹78,000 in central subsidy is available to Indian homeowners. Here's exactly how to apply and what to expect.
Read this nextOn-Grid vs Off-Grid Solar in India: Which Is Right for You in 2026?
Most urban Indians should choose on-grid solar. But off-grid makes sense in specific situations. An honest comparison.
Read this next